Table of contents
What is IAM?
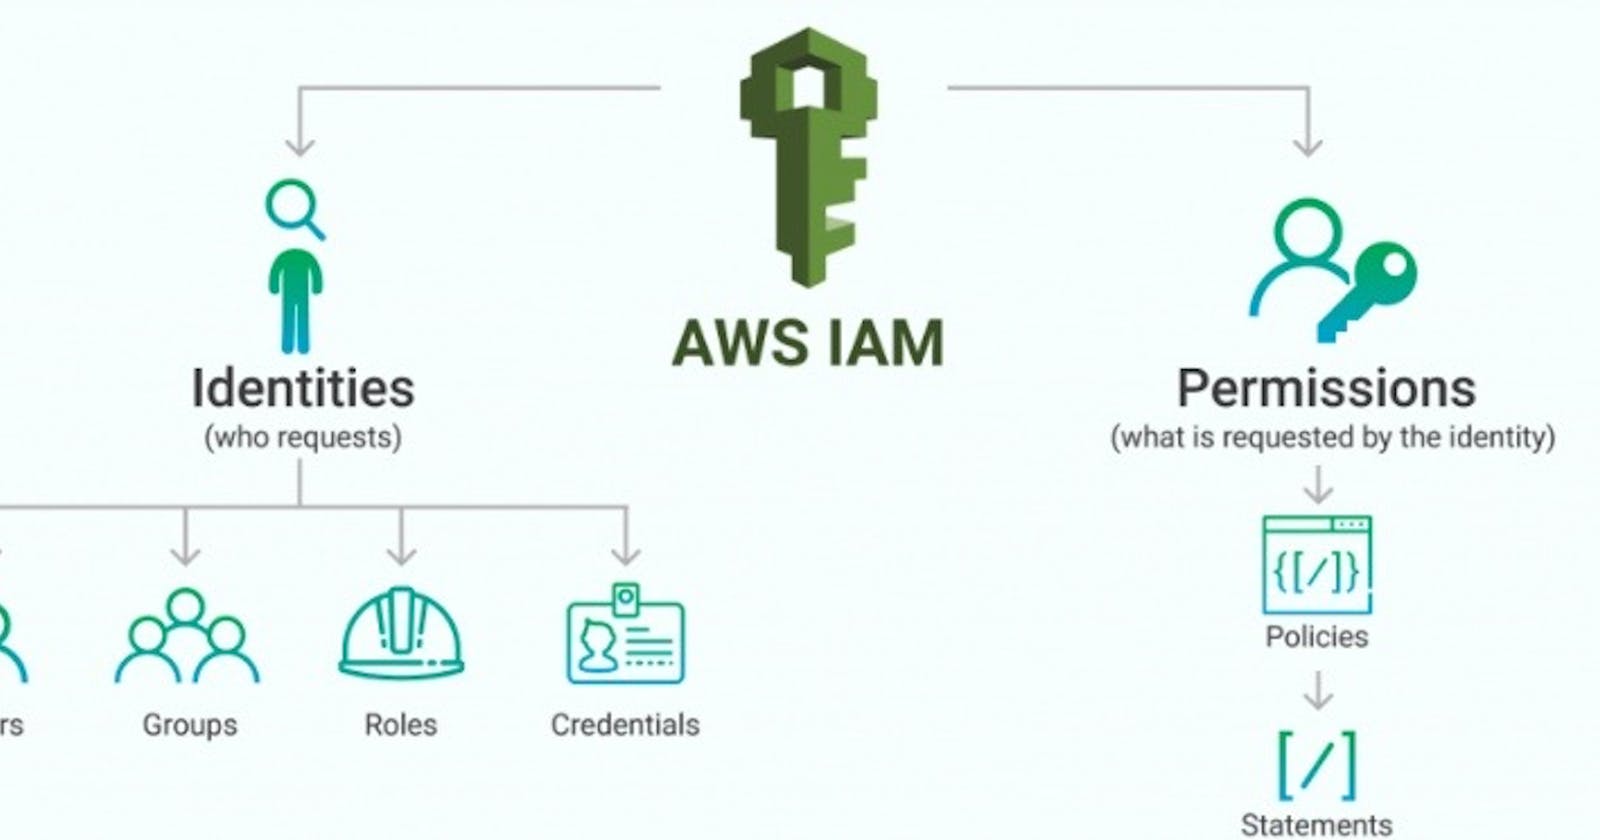
IAM stands for Identity Access Management as the full form itself clarifies that it gives access and manages them. It allows to manage the users and their level of access to AWS Control. It's like a security system for your AWS account.
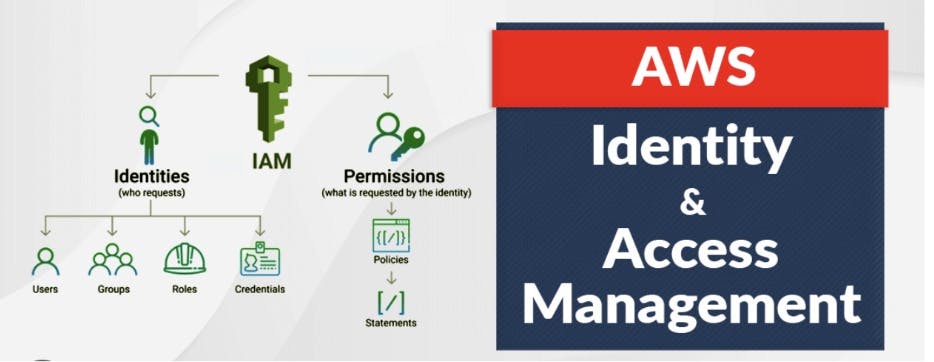
Features of IAM:
IAM allows you to create and manage users, groups, and roles.
With IAM, you can control and define permissions through policies.
IAM follows the principle of least privilege, meaning users and entities are given only the necessary permissions required for their tasks, minimizing potential security risks.
IAM also provides features like multi-factor authentication (MFA) for added security and an audit trail to track user activity and changes to permissions.
Centralized Access Management: AWS IAM provides a centralized and unified way to manage access to AWS resources. It allows you to create and manage IAM users, groups, and roles, and define granular permissions for each entity.
Audit and Compliance: IAM provides comprehensive logging and auditing capabilities, allowing you to track and monitor user activity. You can review access reports, identify potential security issues, and ensure compliance with industry regulations and best practices.
What if there is no IAM?
Let's say the AWS platform does not have the IAM services. Then the organizations have to create multiple user accounts and they will have their billing and subscription to AWS products.
Without IAM we can control the tasks that users can do.
Without IAM it will be a security issue too as the users do not have permission set on their user accounts.
Without IAM it will not be easy to audit and track users as the IAM is a centralized console for all users.
AWS Account Root User :
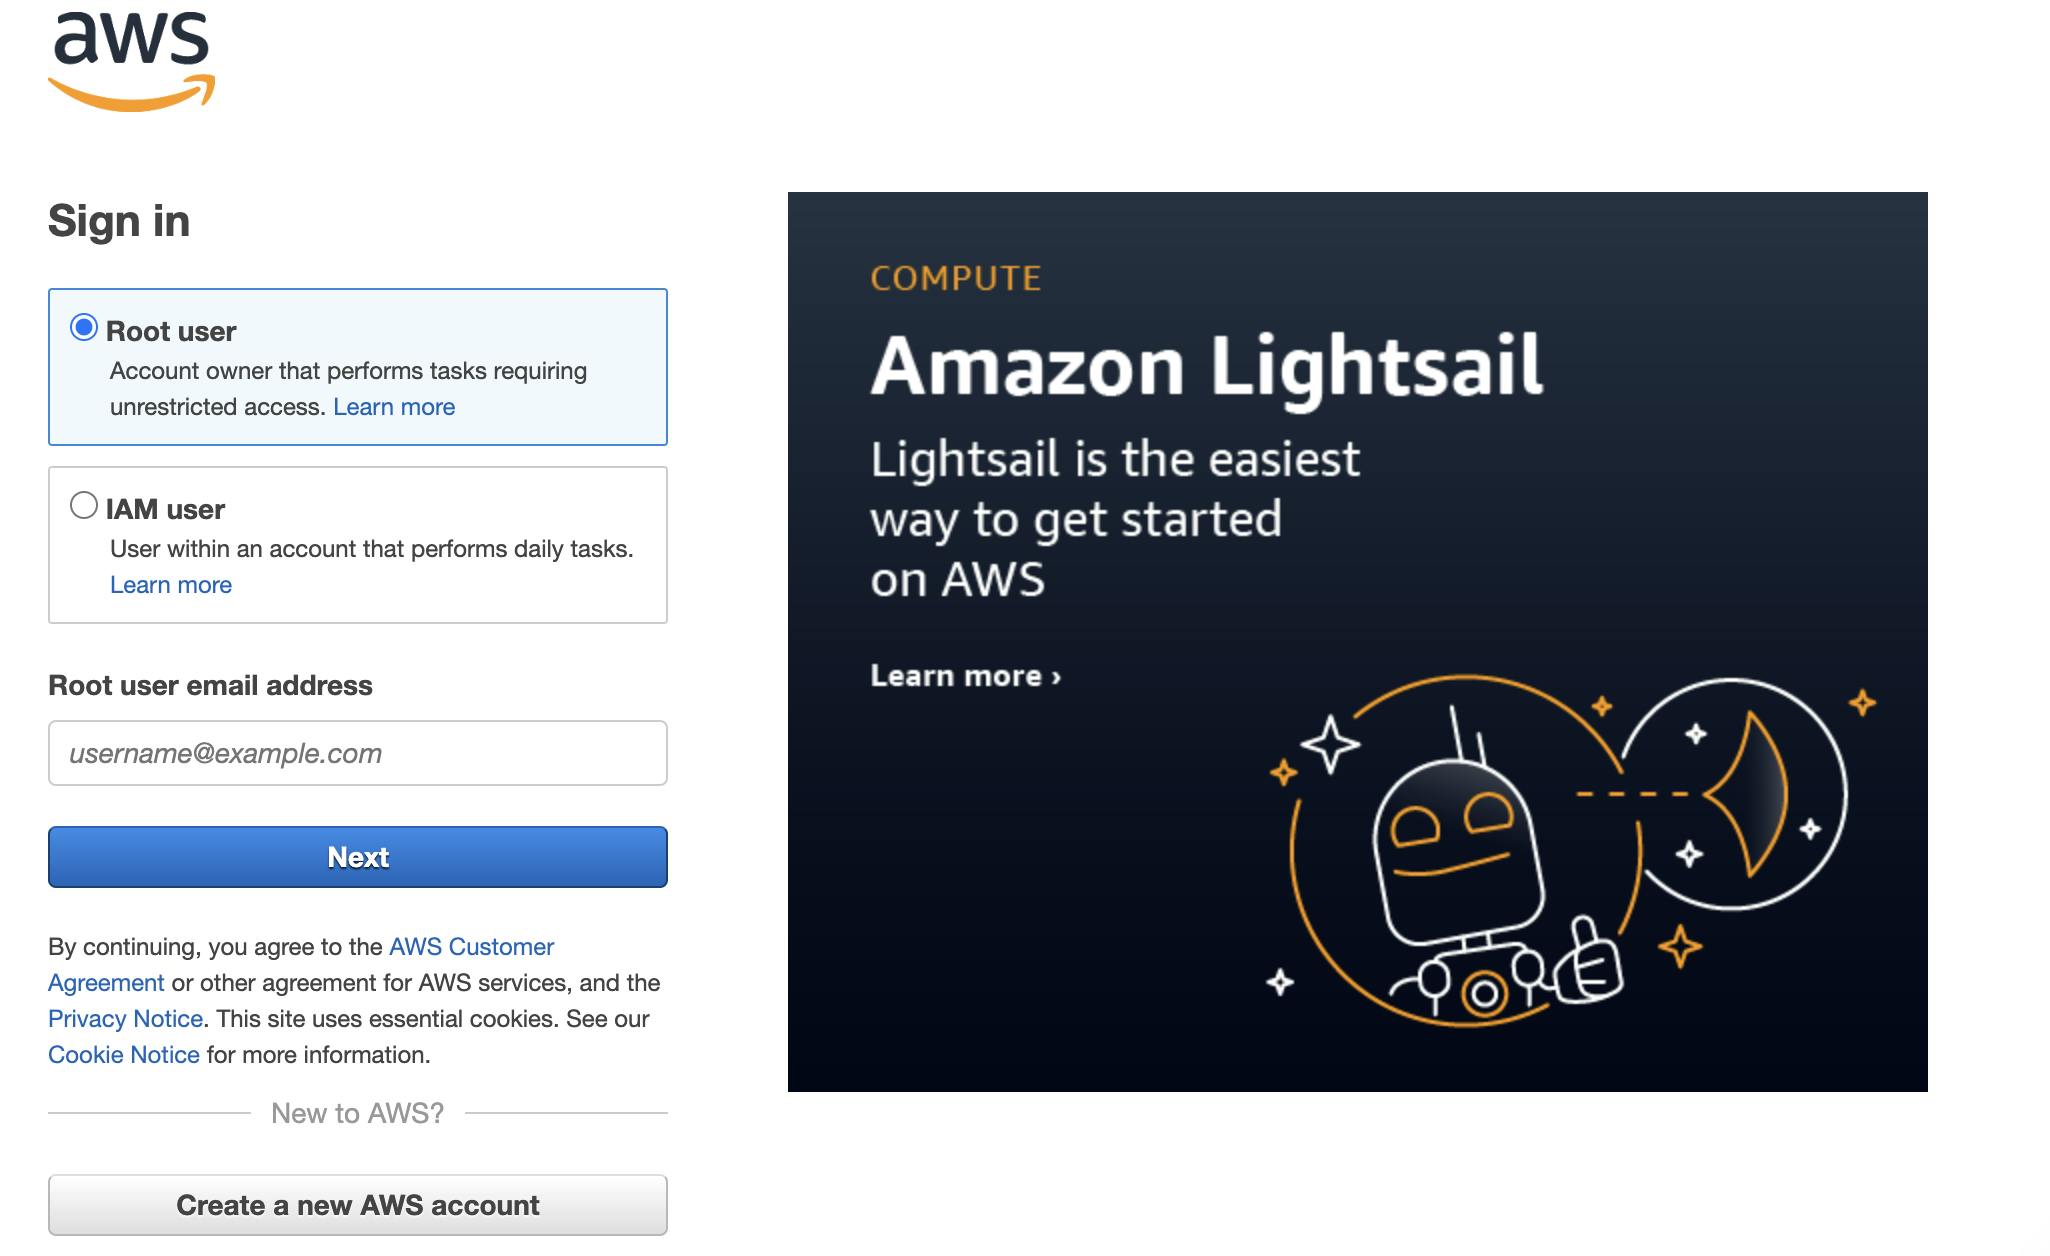
When you hit the link for the AWS console, you will find a button to Sign into the console. Once you click there it will give you a new window as shared above.
Now we have two options one is Root user and the other is IAM user. We can have only one root user per account.
Root users have complete access to all AWS services and resources. It can also change the password for IAM users and view the billing information along with security and permissions on users or groups.
Sign In in AWS Management Console:
By using an Email address and password
Combination of Email address and password (root user credentials)
IAM Identities:
These are created to provide authentication for people/processes in the AWS account.
IAM Identities are categorized into 3 :
IAM Users
IAM Groups
IAM Roles
The IAM user represents the person or service who uses the IAM user to interact with AWS.
Here are some key points for IAM users:
Each IAM user is associated with one and only AWS accounts.
The primary use of IAM users is to log in to the AWS Management Console for interactive tasks and to make different requests to AWS services using the API or CLI.
A user in AWS consists of a name, password to sign in AWS Management console and up to two access keys that can be used by API or CLI. ( In CLI we call it a pem file, which will discuss in future blogs).
Integration of the user with different services like Storage, Database, EC2, ECS etc.
Creating an IAM User (AWS Management Console):
Sign in to the AWS Management Console.
Open the IAM Console
On the navigation pane, click on the Users. After clicking on the Users, the screen appears which is shown below:

Click on the Add User to add new users to your account. After clicking on the Add User, the screen appears which is shown below:

Enter the User name for the user you want to create. You can create five users at a time.
- Select the AWS access type. Either you want a user to have programmatic access, AWS Management Console access or both.
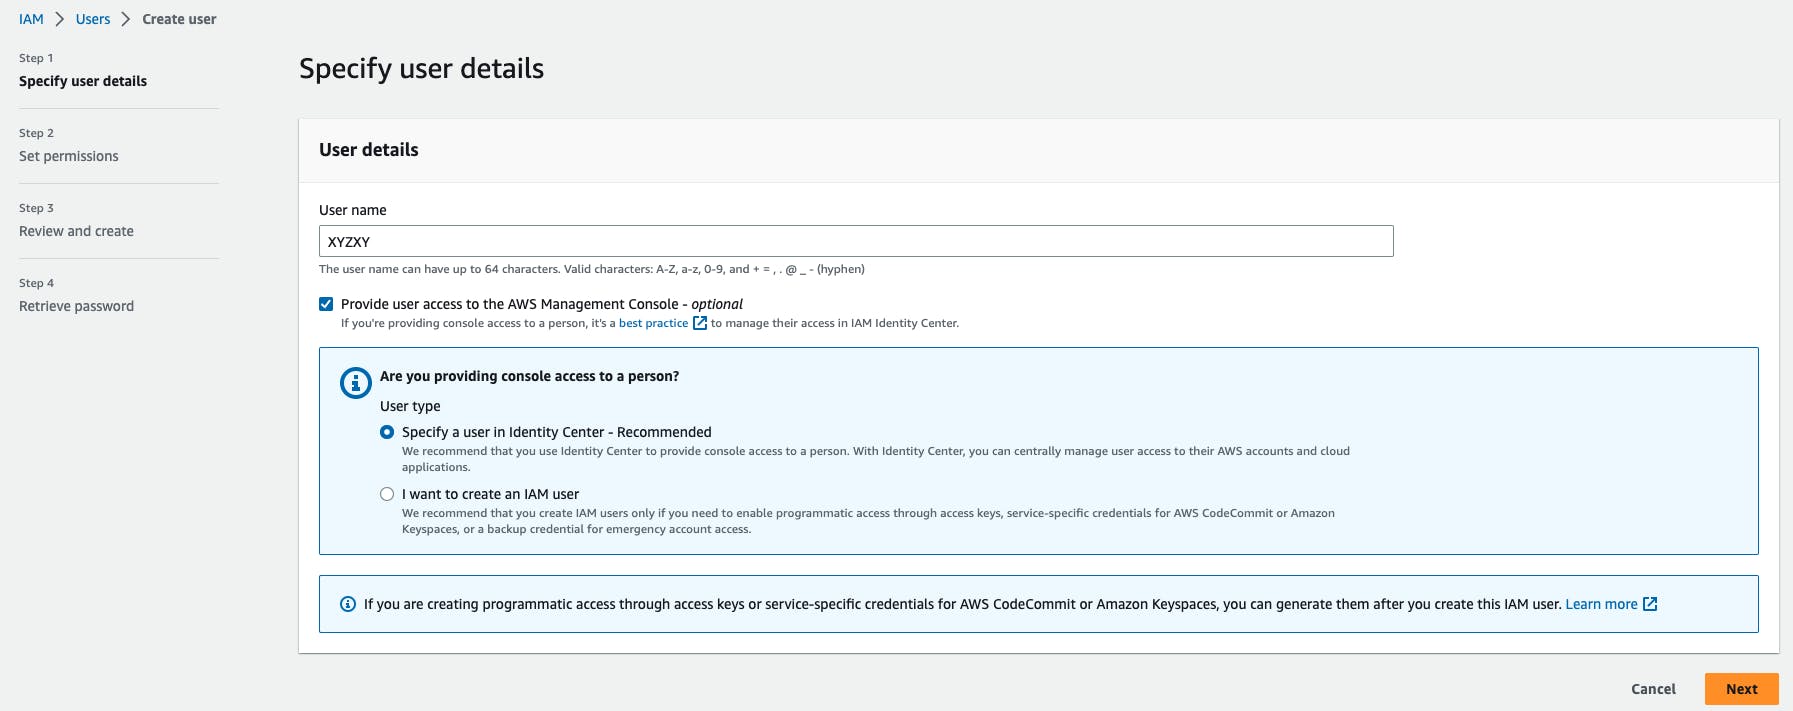
You can also give permission to the user to manage his or her security credentials.
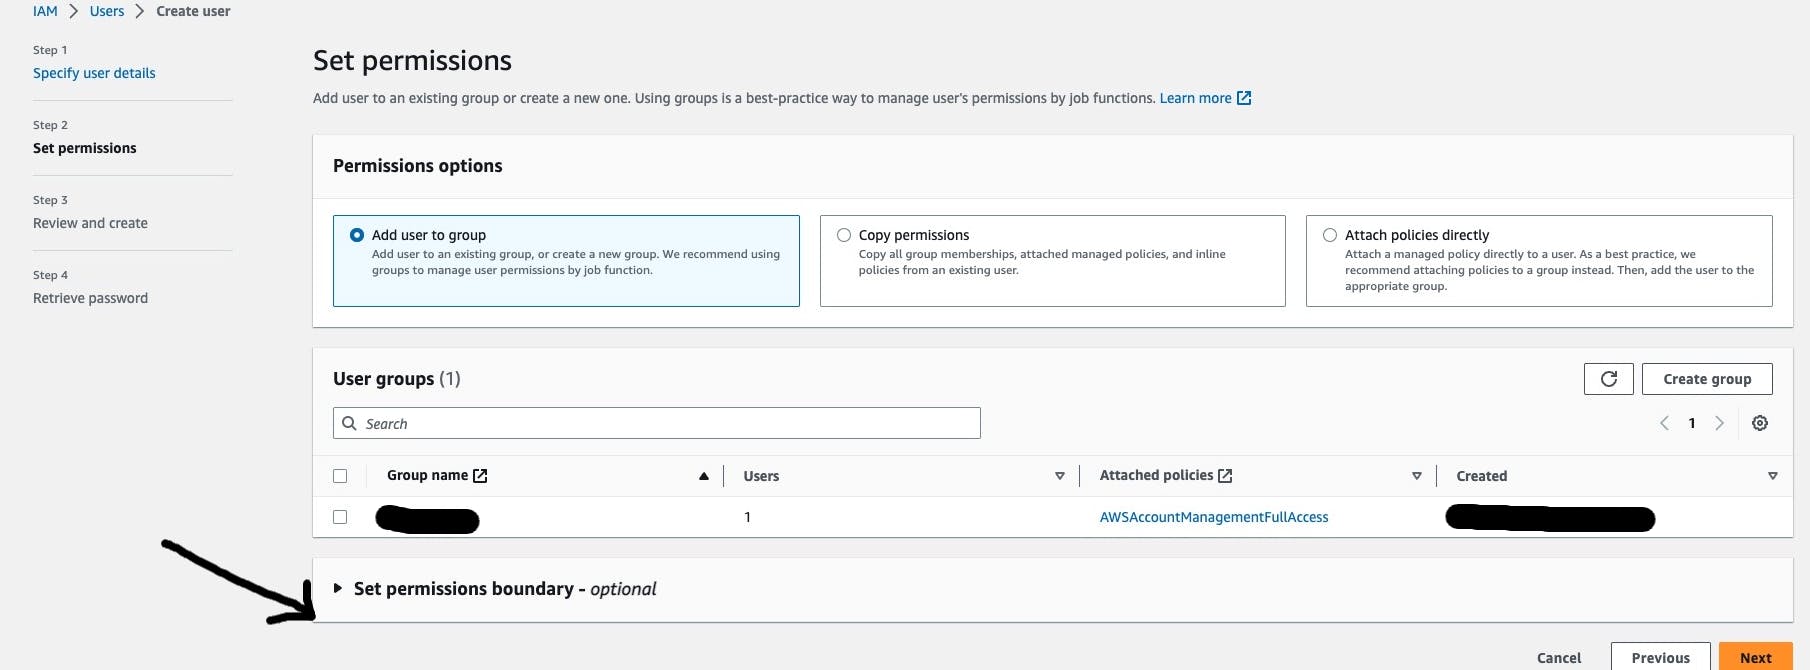
- Now the last step is to Review and create the Account. Also, we can change the password if we are selecting the autogenerated option to create a password.
What are IAM Groups?
IAM groups in AWS (Amazon Web Services) are a collection of IAM users. They provide an efficient way to manage permissions and access control for multiple users with similar roles or responsibilities in the group. Groups can have multiple policies attached to them that grant different permissions.
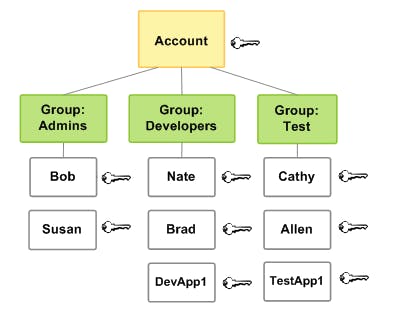
Best Practices: Let's say we have 2 different groups named Admin and DevOps, now we have 4 new users who have joined the company. They want us to permit them to see the dashboards and safely play with them to get hands-on with the organization's structure and responsibilities. 2 Uses will have Admin access so we will add them to the Admin group, and they will get the same permission as existing users. And the other 2 users need DevOps group permission, so we will add them to the DevOps group.
If in case any of the users have decided to move to another organization, we will just remove the user from the group and all the access for the users will be revoked.
If we have created groups for different roles and responsibilities, then we don't have to give permission to each user individually and this helps engineers to have less workload.
Creating a Group (AWS Management Console)
Sign in to the AWS Management Console by entering your email address and password.
Open IAM Console
In the navigation pane, click on the Groups. After clicking on the Group, the screen appears which is shown below:

Click on "Create New Group" to create a new group. On clicking on the "Create New Group", the screen appears shown below:
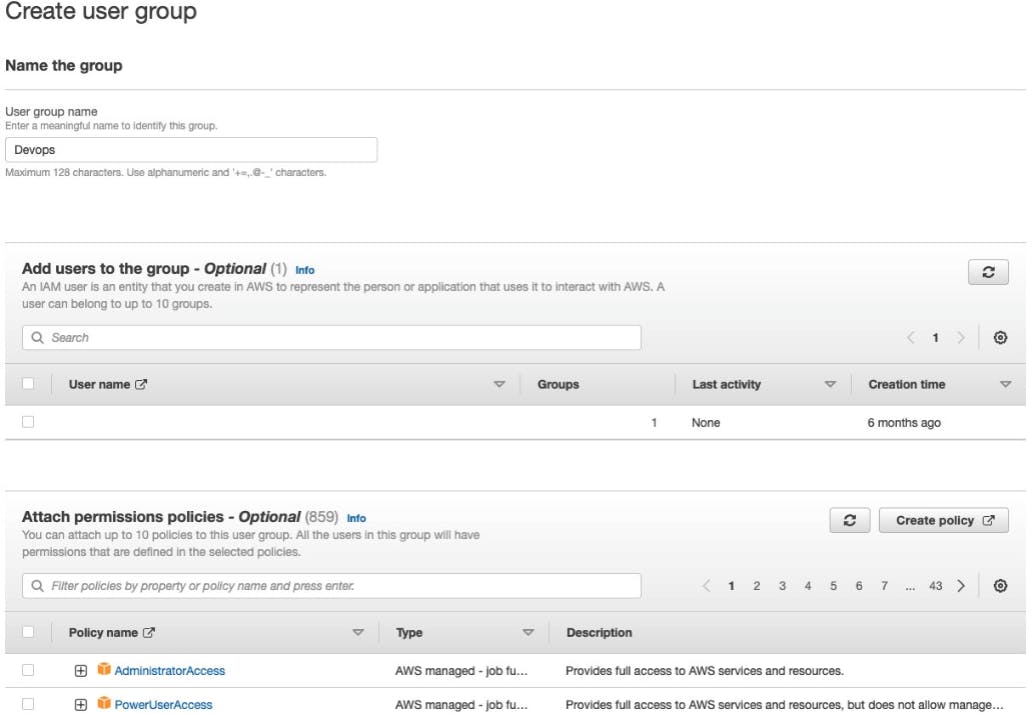
In the Group Name box, enter the group name.
Select the checkbox next to the policy which you want to use with the group. In the above screenshot only 2 Policies are shown there are many more.
Click on the Next Step button and then click on the Create Group.
IAM Roles:
IAM roles are used to grant temporary access to AWS resources. Roles are typically used by applications or services that need to access AWS resources on behalf of users or other services. Roles have associated policies that define the permissions and actions allowed for the role.
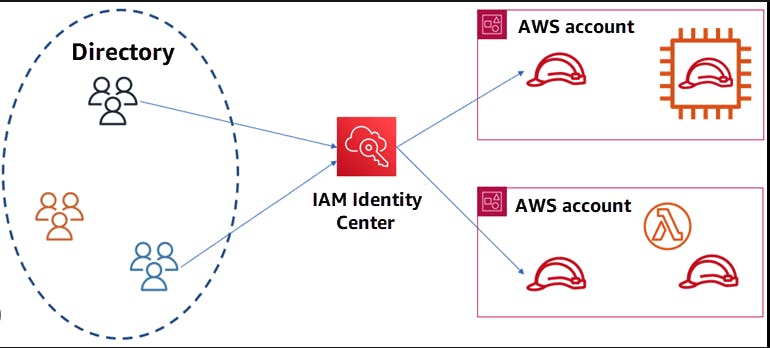
Following are the important terms associated with the "IAM Roles":
Delegation: Delegation is a process of granting permissions to the user to allow access to the AWS resources that you control. Delegation sets up the trust between a trusted account (an account that owns the resource) and a trusting account (an account that contains the users that need to access the resources).
The trusting and trusted account can be of three types:Same account
Two different accounts under the same organization control
Two different accounts are owned by different organizations.
To delegate permission to access the resources, an IAM role is to be created in the trusting account that has the two policies attached.
Permission Policy: It grants the user a role and the needed permissions to carry out the intended tasks.
Trust Policy: It specifies which trusted account members can use the role.
Federation: Federation is a process of creating a trust relationship between the external service provider and AWS. For example, Facebook allows the user to log in to different websites by using their Facebook accounts.
Trust policy: A document was written in JSON format to define who is allowed to use the role. This document is written based on the rules of the IAM Policy Language.
Permissions policy: A document written in JSON format to define the actions and resources that the role can use. This document is based on the rules of the IAM Policy Language.
Permissions boundary: It is an advanced feature of AWS in which you can limit the maximum permissions that the role can have. The permission boundaries can be applied to IAM User or IAM role but cannot be applied to the service-linked role.
Principal: A principal can be an AWS root account user, an IAM User, or a role. The permissions can be granted in one of two ways:
Attach a permission policy to a role.
For the services that support resource-based policies, you can identify the principal in the principal element of policy attached to the resource.
Cross-account access: Roles vs Resource-Based Policies: It allows you to grant access to the resources in one account to the trusted principal in another account is known as cross-account access. Some services allow you to attach the policy directly, known as the Resource-Based policy. The services that support Resource-Based Policy are Amazon S3 buckets, Amazon SNS, and Amazon SQS Queues.
IAM Roles Use Cases:
IAM Console: When IAM Users working in the IAM Console and want to use the role, then they access the permissions of the role temporarily. An IAM Users give up their original permissions and take the permissions of the role. When IAM User exits the role, their original permissions are restored.
Programmatic Access: An AWS service such as Amazon EC2 instance can use role by requesting temporary security credentials using the programmatic requests to AWS.
An IAM Role can be used in the following ways:
IAM User
Applications and services
Federated Users.
Creating IAM Roles:
Go to the IAM section in the AWS Management console.
On the left-hand side menu bar click on Roles. It will pop up a new window.
On the right-hand side click on create role.
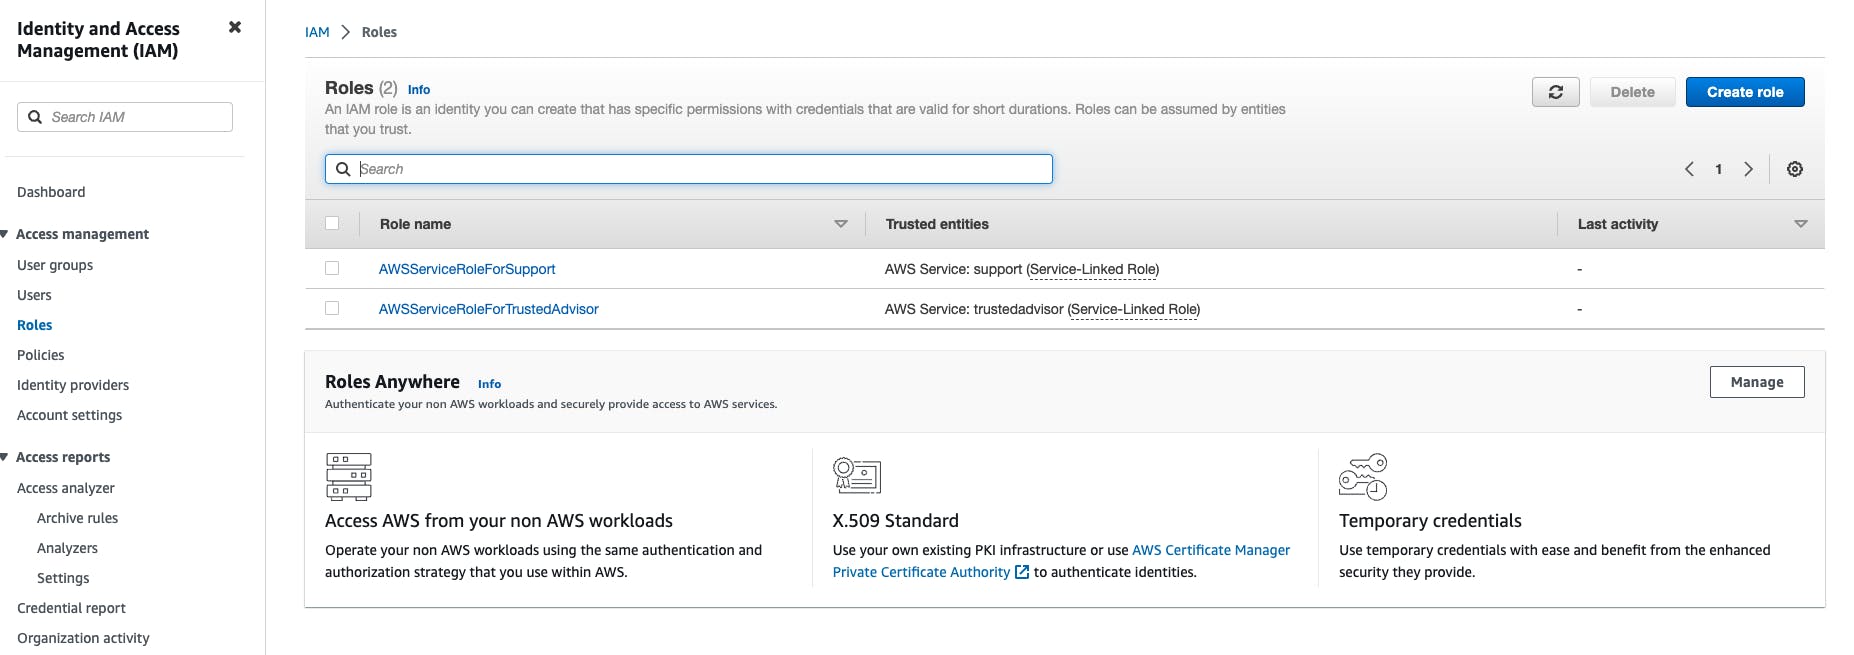
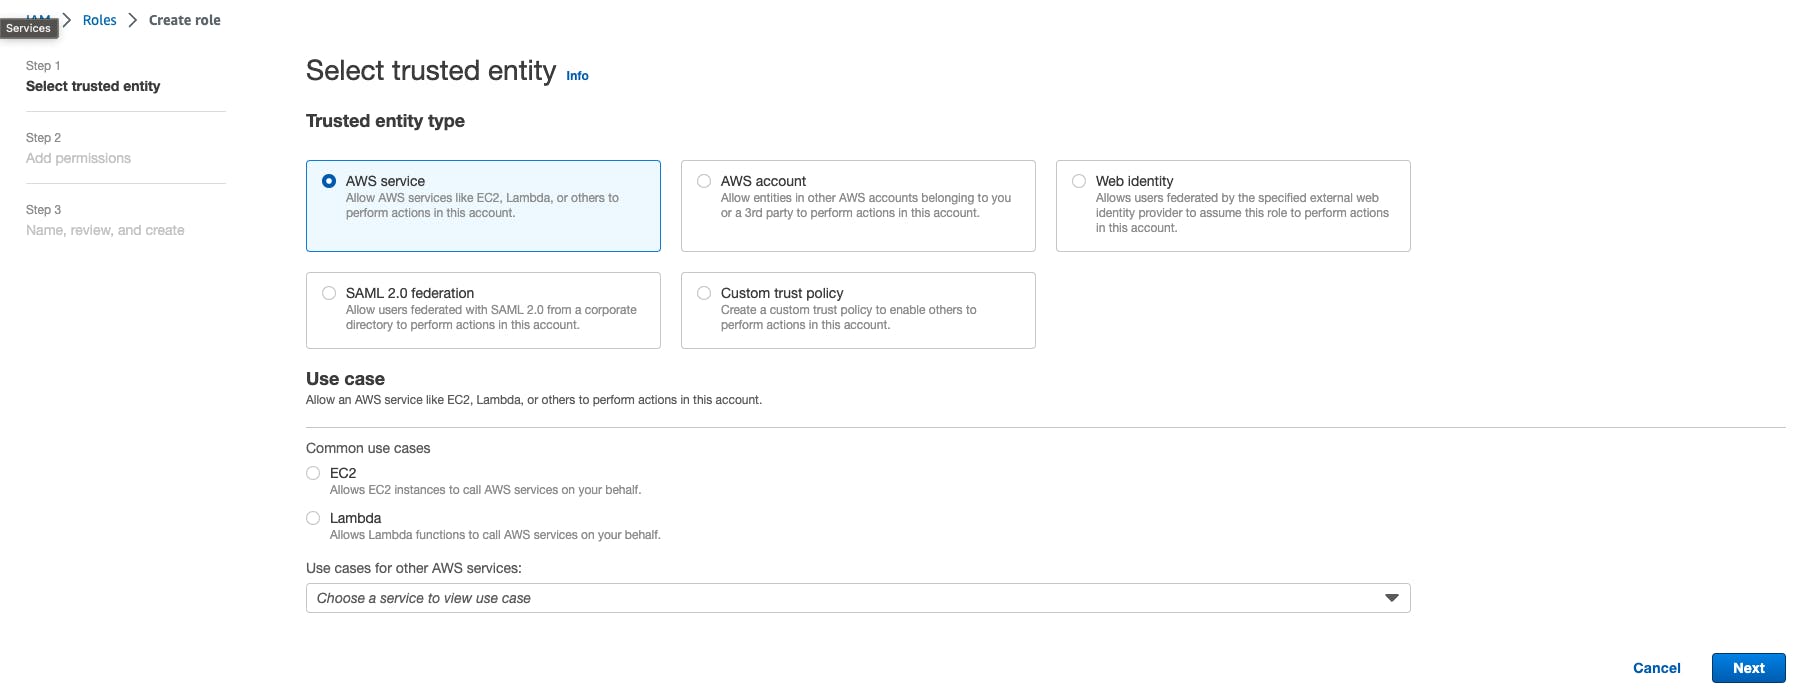
Select the trusted entity that you want for this particular role. Let's say we are going with an AWS service entity with EC2 as a common use case.
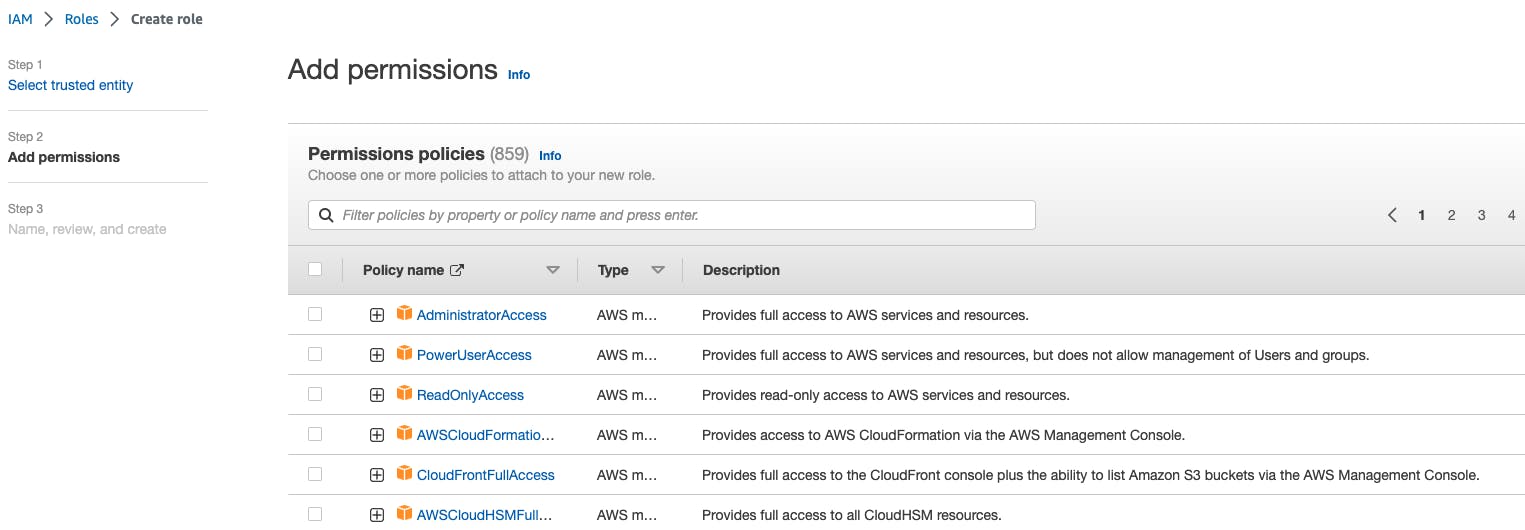
Now Select all the permission that you want to give for this role.
In the last step, we have to review all the given information and create the role.
IAM Policies:
IAM policies are JSON documents that define permissions. Policies specify the actions that can be performed on AWS resources and the resources to which the actions apply. Policies can be attached to users, groups, or roles to control access. IAM provides both AWS-managed policies (predefined policies maintained by AWS) and customer-managed policies (policies created and managed by AWS users).
Policy types
The following policy types, listed in order from most frequently used to less frequently used, are available for use in AWS. For more details, see the sections below for each policy type.
Identity-based policies – Attach managed and inline policies to IAM identities (users, groups to which users belong, or roles). Identity-based policies grant permissions to an identity.
Resource-based policies – Attach inline policies to resources. The most common examples of resource-based policies are Amazon S3 bucket policies and IAM role trust policies. Resource-based policies grant permissions to the principal that is specified in the policy. Principals can be in the same account as the resource or in other accounts.
Permissions boundaries – Use a managed policy as the permissions boundary for an IAM entity (user or role). That policy defines the maximum permissions that the identity-based policies can grant to an entity but does not grant permissions. Permissions boundaries do not define the maximum permissions that a resource-based policy can grant to an entity.
Organizations SCPs – Use an AWS Organizations service control policy (SCP) to define the maximum permissions for account members of an organization or organizational unit (OU). SCPs limit permissions that identity-based policies or resource-based policies grant to entities (users or roles) within the account but do not grant permissions.
Access control lists (ACLs) – Use ACLs to control which principals in other accounts can access the resource to which the ACL is attached. ACLs are similar to resource-based policies, although they are the only policy type that does not use the JSON policy document structure. ACLs are cross-account permissions policies that grant permissions to the specified principal. ACLs cannot grant permissions to entities within the same account.
Session policies – Pass advanced session policies when you use the AWS CLI or AWS API to assume a role or a federated user. Session policies limit the permissions that the role or user's identity-based policies grant to the session. Session policies limit permissions for a created session but do not grant permissions. For more information, see Session Policies.
IAM Policy Creation:
Go to the IAM section in the AWS Management console.
On the left-hand side menu bar click Policies. It will pop up a new window.
On the right-hand side click on Create Policy.

Now select a service on which you want to create policies, for this blog let’s say EC2.

Grant permission to actions allowed. Let’s say we are selecting all read actions.
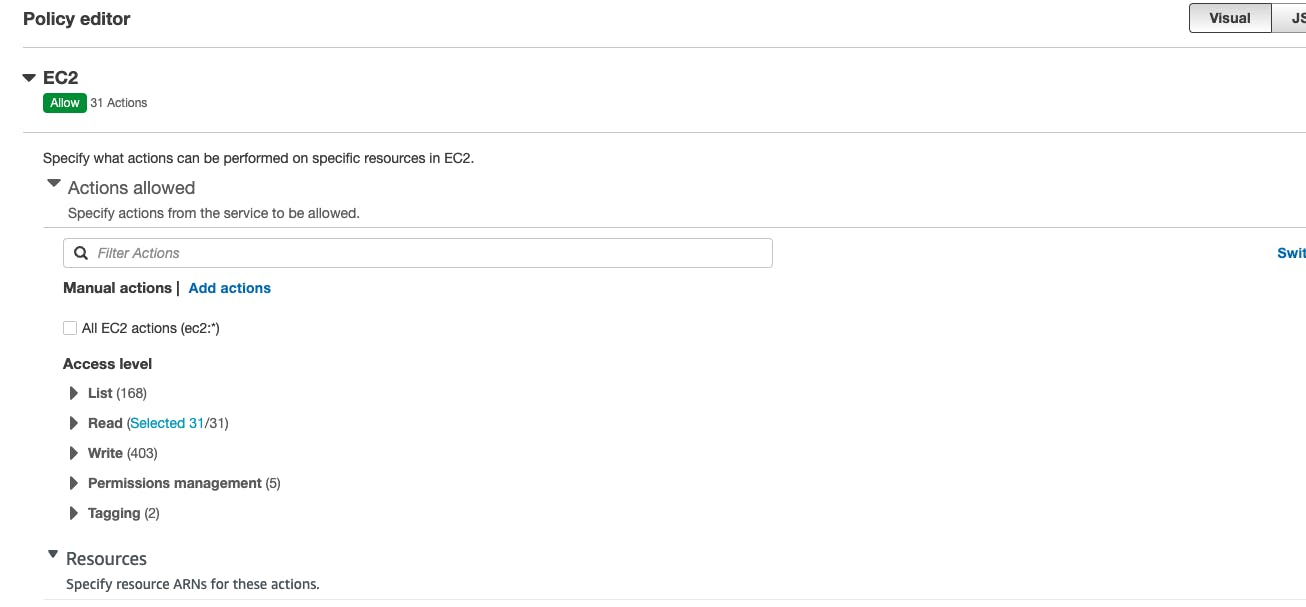
Grant permission to Resources allowed. Let’s say we are selecting capacity reservation.

And we are selecting that only MFA Authenticated users are allowed. And Click on Next.

Now we have to review and apply the same.
Hope this was helpful. Thank you for your time !!
Stay Connected, many more to come !!
